Most rooms are lit by one ceiling fixture, and most rooms look worse for it. A single overhead source produces flat, even light with no depth, hard shadows under furniture, and dark corners.
Lighting is also the design element that affects photographs most. A well-composed room with poor lighting photographs badly. A modest room with good lighting photographs well.
This covers how lighting layers work, where fixtures go, and what to prioritize when you can only do one thing.
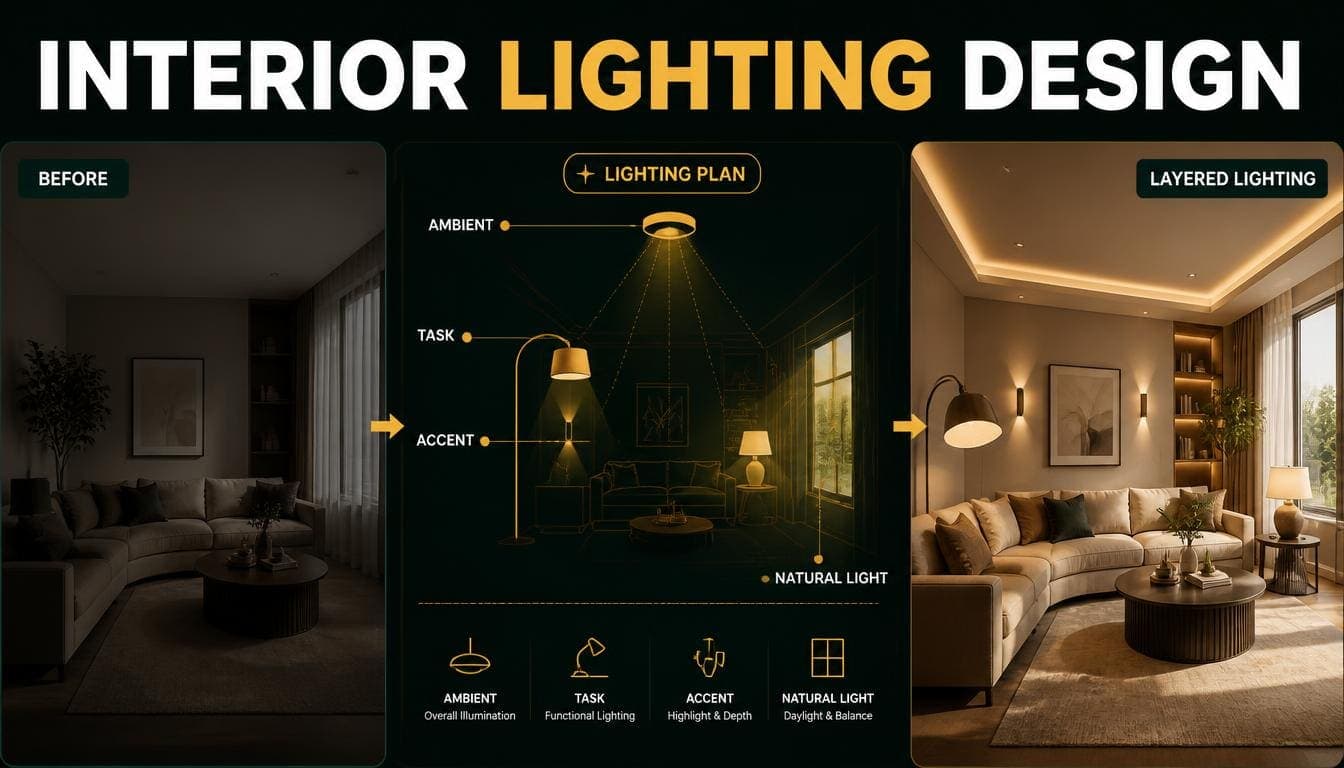
The Three Layers
Every properly lit room has three types of light doing different jobs. Most rooms have one.
Ambient — The Base Layer
General illumination that lets you see and move around the room.
Sources: Ceiling fixtures, recessed downlights, large pendants, wall-washing fixtures.
The job: Fill the room to a comfortable overall level.
The problem when it's the only layer: Flat. Everything evenly lit means nothing stands out, and rooms lose their sense of depth.
Task — The Functional Layer
Directed light for specific activities — reading, cooking, working, applying makeup.
Sources: Table lamps, desk lamps, under-cabinet strips, reading sconces, pendants over work surfaces.
The job: Provide adequate light where something specific happens.
Why it matters for staging: A visible task light signals that the room works for its purpose. A living room with a reading lamp reads as somewhere you'd actually sit and read.
Accent — The Depth Layer
Light directed at specific objects or surfaces to create visual interest.
Sources: Picture lights, uplights, spots directed at artwork, LED strips in shelving, wall grazing.
The job: Create contrast, which is what makes rooms look considered rather than merely lit.
The honest note: this is the layer most rooms skip entirely, and it's the one that separates a designed room from a functional one.
Try DecoAI Free
3 free credits. No credit card needed. Stage any room in 30 seconds.
Get 3 Free CreditsWhy Single-Source Lighting Fails
It Produces Flat Images
Even illumination means no shadow gradient, and shadow gradient is what gives photographs depth. A room lit by one overhead source looks two-dimensional.
It Creates Hard Shadows Below
Light coming straight down puts hard shadows under every horizontal surface — beneath the coffee table, under seat cushions, below shelving. These read as heavy.
It Leaves Corners Dark
A central ceiling light illuminates the centre of a room and drops off toward the edges. Dark corners read as boundaries, which makes rooms look smaller than they are.
It's the Wrong Colour Temperature Usually
Standard ceiling bulbs are often cooler than lamp bulbs. A room lit only by overhead light frequently reads as clinical.
The Practical Fix
If you do only one thing: add two lamps at different heights.
A floor lamp in a corner and a table lamp on a side table transforms a room lit by a single ceiling fixture. It fills the dark corners, adds shadow gradient, and creates the sense of depth that overhead-only lighting can't.
Cost: $60–$150 for two basic lamps. Effect: Larger than almost any other single change.
Colour Temperature
The number on the bulb packaging matters more than most people realize.
| Temperature | Appearance | Best for |
|---|---|---|
| 2200–2700K | Very warm, amber | Bedrooms, evening living rooms |
| 2700–3000K | Warm white | Living rooms, dining, most residential |
| 3000–3500K | Neutral | Kitchens, bathrooms, home offices |
| 4000K+ | Cool white | Utility, garage, task-specific only |
The Residential Rule
2700K for living spaces and bedrooms. 3000K for kitchens and bathrooms.
Anything above 3500K reads as commercial in a home. It's the single most common lighting error in otherwise well-presented properties.
Consistency Matters
Mixing 2700K lamps with 4000K ceiling bulbs in the same room produces a visible temperature clash — one area looks orange, another looks blue.
Practical check: photograph the room with all lights on. Temperature mismatches are far more obvious in a photograph than in person.
Lighting by Room
Living Room
Ambient: Ceiling fixture or recessed downlights Task: One or two table lamps, a floor lamp beside seating Accent: Picture light or an uplight behind a plant
Minimum for a good result: ceiling fixture plus two lamps at different heights.
Placement note: a floor lamp in the corner furthest from the window fills the darkest part of the room.
Bedroom
Ambient: Ceiling fixture, ideally dimmable Task: Bedside lamps or wall sconces on both sides Accent: Optional — a low-level light or LED strip
The rule: matching lights on both sides of the bed. A single bedside lamp reads as asymmetric and unconsidered.
Temperature: 2700K or warmer. Bedrooms benefit from the warmest light in the house.
Kitchen
Ambient: Ceiling downlights Task: Under-cabinet strips — the most functionally useful light in any kitchen Accent: Pendants over an island
The under-cabinet point: these illuminate the actual work surface, which overhead lights don't when you're standing at the counter. They also make kitchens photograph noticeably better.
Dining Room
Ambient: Minimal — the pendant does most of the work Task: A pendant or chandelier centred over the table Accent: Wall sconces or a lit sideboard
Placement: pendant centred over the table, not the room, hung 75–85cm above the table surface.
This is the room where a single well-placed fixture achieves most of the effect.
Home Office
Ambient: Ceiling fixture Task: Adjustable desk lamp — essential Accent: Optional
Temperature: 3000–3500K. Slightly cooler light supports focus better than warm light.
Placement: desk lamp on the opposite side to your writing hand, to avoid casting shadow.
Bathroom
Ambient: Ceiling fixture Task: Sconces either side of the mirror — not above it Accent: Optional
The mirror point: light from above casts shadows down the face. Sconces at either side light the face evenly. This is the single most useful bathroom lighting decision.
Try DecoAI Free
3 free credits. No credit card needed. Stage any room in 30 seconds.
Get 3 Free CreditsLighting for Photographs
Property photography has specific lighting requirements that differ from daily living.
Turn Everything On
Every fixture, every lamp, regardless of time of day. Interior lights fill shadow areas that windows don't reach.
The counter-intuitive part: even in bright midday sun, interior lights improve the image by lifting the corners.
Open Everything
All curtains and blinds fully. Natural light does more than any fixture, and partially closed coverings reduce it for no benefit.
Check for Temperature Mismatch
Photograph the room and look at the image. If one area reads orange and another blue, you have mixed bulb temperatures. Replacing bulbs to match is cheap and visible.
Replace Blown Bulbs First
A dead bulb produces a dark patch that reads as neglect. Check every fixture before photographing.
Avoid Flash
Camera flash produces flat light with hard shadows behind furniture. It's the fastest way to make a room look worse than it is.
Shoot Midday for Interiors
10am to 2pm. Even light, short shadows, natural colour rendering.
Common Lighting Mistakes
1. Single Ceiling Source
The most common issue in residential lighting. Flat, shadowed, and dark at the edges.
2. Cool White Bulbs in Living Spaces
4000K+ reads as commercial. Use 2700K in living rooms and bedrooms.
3. Mixed Colour Temperatures
Produces visible clashes, particularly obvious in photographs.
4. Bathroom Lights Above the Mirror
Casts shadows down the face. Sconces at either side work better.
5. Single Bedside Lamp
Reads as a constraint. Both sides, matching.
6. No Task Lighting
A living room without a reading lamp doesn't demonstrate that you could read there.
7. Pendant Centred in the Room, Not Over the Table
Common in dining rooms and immediately noticeable.
8. Skipping Under-Cabinet Lighting in Kitchens
The most functionally useful kitchen light, and frequently absent.
What to Prioritize
If you're improving lighting with limited budget or effort, in order:
1. Replace any blown bulbs. Free effect, immediate.
2. Match colour temperatures. $20–$40 in bulbs. Removes visible clashes.
3. Add two lamps to the main living space. $60–$150. Largest single improvement available.
4. Add under-cabinet lighting to the kitchen. $30–$80 for a plug-in LED strip.
5. Add bedside lamps if missing. $40–$80 for a pair.
6. Add a pendant over the dining table if there isn't one. $50–$200.
Beyond this, lighting improvements become architectural — recessed downlights, wiring changes, sconce installation — and the return diminishes for a property you're selling.
Frequently Asked Questions
What are the three layers of lighting?
Ambient (general illumination), task (directed light for activities), and accent (light on specific objects for depth). Most rooms have only ambient.
Why does my room look flat?
Almost certainly single-source ceiling lighting. Adding two lamps at different heights creates shadow gradient, which is what gives rooms depth.
What colour temperature should I use?
2700K for living rooms and bedrooms, 3000K for kitchens and bathrooms. Above 3500K reads as commercial in a home.
Should bathroom lights go above or beside the mirror?
Beside. Light from above casts shadows down the face; sconces at either side light it evenly.
How high should a dining pendant hang?
75–85cm above the table surface, centred over the table rather than the room.
Do I need under-cabinet lighting in a kitchen?
It's the most functionally useful light in any kitchen — overhead lights don't reach the work surface when you're standing at it. It also improves how kitchens photograph.
Should I turn on lights for property photographs?
Yes, every fixture, regardless of time of day. Interior lights fill the corners that windows don't reach.
What's the cheapest lighting improvement?
Matching colour temperatures across a room — $20–$40 in bulbs, and it removes visible clashes that photograph badly.
How many lamps does a living room need?
At minimum two at different heights — a floor lamp and a table lamp — in addition to the ceiling fixture.
Summary
The three layers: Ambient, task, accent. Most rooms have only the first, which is why they look flat.
The single biggest improvement: two lamps at different heights in the main living space. $60–$150 and it changes the room more than anything else at that price.
Colour temperature: 2700K living spaces and bedrooms, 3000K kitchens and bathrooms. Consistency within a room matters as much as the number itself.
For photographs: every light on, all curtains open, no flash, shoot between 10am and 2pm, and check for temperature mismatches in the resulting image.
Good lighting makes staging work harder. DecoAI gives 3 free credits with no card required — well-lit input photos produce noticeably better staged results.